Arduino를 배우고 싶어요
뭐가 필요하죠?
- Arduino
- Arduino IDE가 설치된 PC
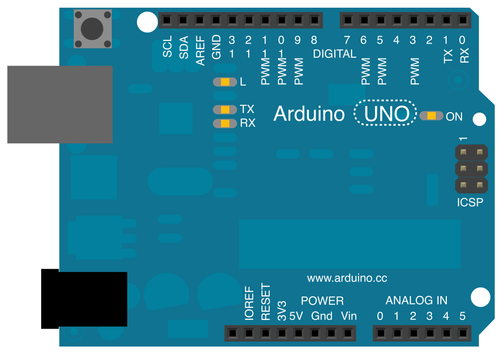
일단, 아두이노를 살펴봅시다.
(위 이미지는 Fritzing 툴을 사용해 만들어졌습니다.)
일단 아두이노는 이렇게 생겼습니다.
어떻게 사용하죠?
간단합니다.
IDE로 스케치를 작성한 후, Arduino를 PC에 연결하고 작성한 스케치를 전송하면 됩니다.(아두이노에서는 프로그램을 스케치라고 부릅니다.)
어떻게 작성하냐구요?
아래 두 함수를 적절히 작성하면 됩니다.
void setup() {
    // 설정 코드를 넣는 위치입니다. 딱 한 번만 실행되요.
}

void loop() {
    // 동작 코드를 넣는 위치 입니다. 무한반복됩니다.
}
나도 LED 켜고 싶어요
일단 LED를 켜기 위해서는 LED가 하나 있어야 합니다.
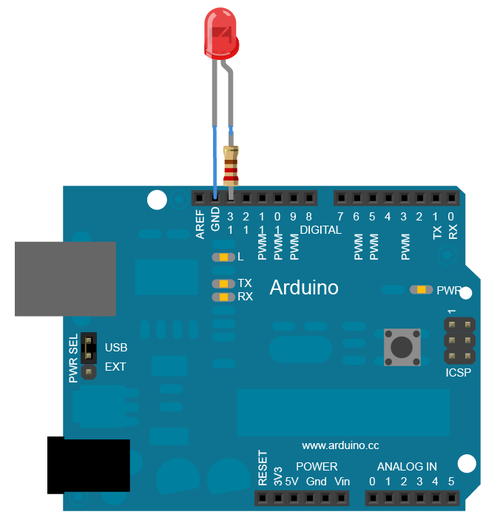
LED를 위와 같이 연결하고 아래 스케치를 IDE 통해서 업로드를 하면 LED가 깜빡일껍니다.
/*
    Blink
    Turns on an LED on for one second, then off for one second, repeatedly.
    This example code is in the public domain.
 */

// Pin 13 has an LED connected on most Arduino boards.
// give it a name:
int led = 13;

// the setup routine runs once when you press reset:
void setup() {
    // initialize the digital pin as an output.
    pinMode(led, OUTPUT);
}

// the loop routine runs over and over again forever:
void loop() {
    digitalWrite(led, HIGH);   // turn the LED on (HIGH is the voltage level)
    delay(1000);               // wait for a second
    digitalWrite(led, LOW);    // turn the LED off by making the voltage LOW
    delay(1000);               // wait for a second
}
위 스케치를 간단히 설명하면,
- setup()
- 13번 핀을 출력용으로 사용할 꺼야.
- loop()
- 13번 핀에 전류를 줄꺼야. 그럼 켜지겠지?
- 1초 쉬자.
- 13번 핀에 전류를 안줄꺼야. 그럼 꺼지겠지?
- 1초 쉬자.
실행하면 1초 주기로 계속 LED가 깜빡 거릴껍니다.
위 자료는 http://arduino.cc/en/Tutorial/Blink 에서 가져왔습니다.
이제 LED를 켜셨습니다.
나도 웹을 통해 LED 켜고 싶어요
웹을 통해서 LED를 키신다구요? 위의 예제를 조금 수정해서 LED를 켜보도록 하죠.
일단 Arduino가 웹이든 어디든 누군가에게로 부터 명령을 받을 수 있게 수정해야합니다.
Arduino에게 “1” 이라 외치면 LED가 켜지고, “0”이라고 외치면 LED가 꺼질 수 있도록 말이죠.
/*
    Blink
    Turns on an LED on for one second, then off for one second, repeatedly.
    This example code is in the public domain.
 */

// Pin 13 has an LED connected on most Arduino boards.
// give it a name:
int led = 13;

// the setup routine runs once when you press reset:
void setup() {
    // initialize the digital pin as an output.
    pinMode(led, OUTPUT);
}

// the loop routine runs over and over again forever:
void loop() {
int incomingValue = 0;            // 보낸값을 저장하기 위한 변수 선언

    if ( Serial.available() > 0 ) {  // 뭔가 입력값이 있다면
        incomingValue = Serial.read();
    }

    if ( incomingValue == 49 ) {     // 값이 '1' 이면
        digitalWrite(13, HIGH);      // LED를 켠다.
    }

    if ( incomingValue == 48 ) {     // 값이 '0' 이면
        digitalWrite(13, LOW);       // LED를 끈다.
    }
}
일단 이렇게 작성하고 Arduino에 업로드를 합니다.
그리고 웹에서 Arduino를 키기 위해서는, 아두이노가 웹서버에 연결이 되어야 할 것 같네요.
그 이유는, 웹페이지에서 누군가 LED 켜기 버튼을 눌렀을 때, 그 값을 웹서버가 받아서 아두이노에 전달해줘야하기 때문이죠.
그럼 웹서버는 Arduino와 어떻게 통신할까요? Arduino IDE에서 프로그램을 업로드 할 때와 같은 방식의 통신을 해야할 것 같은데요. Arduino는 USB Serial Modem으로 연결이 되어 있어서 웹서버에서 Arduino에 값을 보내려면 Modem 통신 라이브러리를 사용해야합니다.(뭔가 어려워지네요…)
NodeJS 쪽에는 Serial 통신용 모듈인 node-serialport라는게 있습니다. 이 모듈을 사용한다면 아래와 같은 모양으로 Arduino에 “1”/“0”을 보낼 수 있겠네요.
var SerialPort = require("serialport").SerialPort
var serialPort = new SerialPort("/dev/tty-usbserial1", {
    baudrate: 9600
}, false);

serialPort.open(function () {
    console.log('접속되었구요');
    serialPort.on('data', function(data) {
        // Arduino에서 뭔가 데이터를 보내주면 출력할꺼에요.
        console.log('data received: ' + data);
    });

    serialPort.write("1", function(err, results) {
        // LED가 무작정 켜질꺼에요.
    });
});
Arduino가 아닌 NodeJS로 LED를 켜는걸 해봤으니…
NodeJS로 웹서버를 띄운다면 웹에서 LED 켜는게 가능해지겠죠?
Express 라는 NodeJS 모듈을 이용해 간단히 켜볼까요?
일단 간단히 앱을 하나 만들어봅시다.
$ sudo npm install -g express
$ express -e simpleApp ; cd simpleApp && npm install
여기서는 Arduino와 연결을 위해 SerialPort 모듈을 사용합니다. 모듈 설치 해야겠죠?
$ npm install serialport
우선, app.js를 수정해서 LED가 Toggle 되는 간단한 프로젝트를 만들어봅시다.
// app.js

/**
 * Module dependencies.
 */

var express = require('express');
var routes = require('./routes');
var user = require('./routes/user');
var http = require('http');
var path = require('path');

var app = express();

// all environments
app.set('port', process.env.PORT || 3000);
app.set('views', __dirname + '/views');
app.set('view engine', 'ejs');
app.use(express.favicon());
app.use(express.logger('dev'));
app.use(express.bodyParser());
app.use(express.methodOverride());
app.use(express.static(path.join(__dirname, 'public')));

// development only
if ('development' == app.get('env')) {
  app.use(express.errorHandler());
}

//
// 이 값에 따라 LED 켜지는게 결정된다.
//
var ledStatus = false;

app.get('/', function(req, res) {
  res.render('index', { title: 'Express' });
});

//
// POST 액션을 받으면 LED가 Toggle 되도록 한다.
//
app.post('/', function(req, res) {
  ledStatus = ledStatus ? false : true;
  res.render('index', { title: 'Express' });
});

http.createServer(app).listen(app.get('port'), function(){
  console.log('Express server listening on port ' + app.get('port'));
});

//
// Serial Port를 사용하는 예제
//

var SerialPort = require("serialport").SerialPort

// Arduino가 /dev/tty-usbserial1 에 연결되었다고 가정합니다.
var serialPort = new SerialPort("/dev/tty-usbserial1", {
    baudrate: 9600
}, false);

serialPort.open(function () {
    console.log('접속되었구요');
    serialPort.on('data', function(data) {
        // Arduino 쪽에서 뭔가 출력했다면 여길 통해서 데이터를 볼 수 있습니다.
        console.log('data received: ' + data);
    });
    setInterval(function(){
        serialPort.write(ledStatus ? "1" : "0", function(err, results) {
            // LED가 ON/OFF 될꺼에요
        });
    }, 100);
});
이제 views/index.ejs 에 버튼을 하나 넣고, 버튼을 누르면 POST Action이 가게끔 수정합니다.
<!-- views/index.ejs -->

<!DOCTYPE html>
<html>
  <head>
    <title><%= title %></title>
    <link rel='stylesheet' href='/stylesheets/style.css' />
  </head>
  <body>
    <h1><%= title %></h1>
    <p>Welcome to <%= title %></p>

    <!-- 간단히 버튼으로 POST를 보내도록 한다. -->
    <form action="/" method="post">
       <button type="submit">눌러봐</button>
    </form>

  </body>
</html>
이제 node app.js로 웹서버를 구동 시키고 http://localhost:3000 로 접속해서 버튼을 눌러봅시다.
버튼이 정상적으로 켜진다면 웹에서 LED를 켜신거구요, 안켜지시는 분은 다시 한번 Arduino 보드에 스케치를 업로드 하셨는지 확인 하시거나 Arduino를 다시 연결해보세요.
여기까지 간단하게 급조한 예제를 살펴봤습니다.
페이지 갱신되는 예제가 허접 보인다구요? 그렇다면 socket.io 쪽을 살펴보시면 도움이 될 것 같아요.
매번 스케치를 업로드 해야하나요? 스크립트 처럼 쓸 수 없을까요?
Firmata라는게 있습니다. 요걸 사용하시면 매번 업로드 하지 않고도 Arduino를 자유롭게 제어할 수 있습니다.
Firmata? 뭐죠?
Firmata는 아두이노 같은 마이크로 컨트롤러와 PC가 서로 통신하기 위해 고안된 범용 프로토콜입니다.
어떻게 쓰는건가요?
일단, Arduino에 최초 StandardFirmata 라는 스케치를 업로드합니다. 그 후에, Arduino와 통신을 하기 위해서는 Firmata 프로토콜에 맞도록 메시지만 보내주시면 됩니다.
만약, NodeJS를 사용해서 Arduino와 통신하고 싶다면 NodeJS으로 제작된 Firmata 모듈을 사용해 Arduino를 제어할 수 있습니다.
NodeJS를 예로 들어볼까요?
NodeJS 쪽 Firmata 모듈 중 Johnny-Five라는 Firmata based Arduino Framework이 있습니다.
var five = require("johnny-five"),
        // or "./lib/johnny-five" when running from the source
        board = new five.Board();

board.on("ready", function() {

    // Create an Led on pin 13 and strobe it on/off
    // Optionally set the speed; defaults to 100ms
    (new five.Led(13)).strobe();
});
위 모듈을 사용해 이전에 만들었던 app.js를 바꿔볼까요?
// app.js

/**
 * Module dependencies.
 */

var express = require('express');
var routes = require('./routes');
var user = require('./routes/user');
var http = require('http');
var path = require('path');

var app = express();

// all environments
app.set('port', process.env.PORT || 3000);
app.set('views', __dirname + '/views');
app.set('view engine', 'ejs');
app.use(express.favicon());
app.use(express.logger('dev'));
app.use(express.bodyParser());
app.use(express.methodOverride());
app.use(express.static(path.join(__dirname, 'public')));

// development only
if ('development' == app.get('env')) {
  app.use(express.errorHandler());
}

//
// 이 값에 따라 LED 켜지는게 결정된다.
//
var ledStatus = false;

app.get('/', function(req, res) {
  res.render('index', { title: 'Express' });
});

//
// POST 액션을 받으면 LED가 Toggle 되도록 한다.
//
app.post('/', function(req, res) {
  ledStatus = ledStatus ? false : true;
  res.render('index', { title: 'Express' });
});

http.createServer(app).listen(app.get('port'), function(){
  console.log('Express server listening on port ' + app.get('port'));
});

//
// Johnny-five 모듈로 보드에 접속해 LED를 제어한다.
//
var five = require('johnny-five')
  , board = new five.Board();

board.on("ready", function() {
    //
    // 13번 PIN을 OUTPUT으로
    //
    this.pinMode(13, 1);

    //
    // 0.1s마다 돌면서 ledStatus 값에 따라 LED를 ON/OFF 한다.
    //
    this.loop(100, function() {
        //
        this.digitalWrite( 13,  ledStatus ? 1 : 0 );
    });
});
Node.js 말고 다른건 없나요?
https://github.com/firmata/arduino에 가시면 언어별 Firmata 클라이언트 라이브러리가 있으니 살펴보시면 도움이 될 것 같습니다.