배경
2012년 여름 쯔음에 Proxy 설정이 없는 기기(특히 구 Android 단말기)들의 Http 요청을 까보기 위해서 루팅 같은 번잡한 방법 말고 깔끔한 방법이 없을까 싶어서 찾아봤다. 왠지 Wifi를 지켜보고 있음 될 것 같다는 생각에 검색 몇 번 하니까 방법이 나온다.
잘되네! 흐흐흐… =_=;;
요약
모바일 페이지 또는 앱 개발시, 프록시가 지원되지 않는 단말기로는 Fiddler나 Charles를 사용하기 어려움이 있다.
이를 해결하고자 여기서는 Wifi를 AP로 하고, AP에 붙은 단말기들의 Packet을 Bridge를 통해 프록시 서버로 전달하는 방법을 설명하고자 한다.
시작에 앞서
이 설정을 이용하기 위해서는 다음과 같은 환경이 필요하다.
- 2개의 네트웍 장비
- 여기서는 iMac의 WIFI와 LAN을 사용한다.
- DHCP Server
- Mac의 인터넷 연결 공유를 사용하면 bootpd가 이 역할을 대신한다.
포트 포워딩을 해야하기 때문에 아래와 같은 설정이 필요하다.
$ sudo sysctl -a | grep fw
net.inet.ip.fw.enable: 0
...
net.inet6.ip6.fw.enable: 0
...
설정이 안되어 있으면 -w 옵션을 사용해 설정한다.
sudo sysctl -w net.inet.ip.fw.enable=1
sudo sysctl -w net.inet6.ip6.fw.enable=1
인터넷 연결 공유 기능 ON
먼저 시스템 환결설정에 공유 항목을 선택한다. 선택하면 아래와 같은 화면을 볼 수 있다.

여기서는 이더넷 의 연결을 공유하고 이를 Wi-Fi 를 통해 사용하기 때문에, 위와 같이 설정한 후 왼편 인터넷 공유에 체크를 하고 시작 을 누른다.
인터넷을 공유하고 나면 이더넷 과 Wi-Fi 환경을 연결해주는 bridge interface가 생기게 된다.
이 이름은 ifconfig -a 를 통해 확인할 수 있다.
(여기서 en0은 이더넷, en1은 Wi-Fi, bridge0는 bridge interface 다.)
$ ifconfig -a
lo0: flags=8049<UP,LOOPBACK,RUNNING,MULTICAST> mtu 16384
    options=3<RXCSUM,TXCSUM>
    inet6 fe80::1%lo0 prefixlen 64 scopeid 0x1
    inet 127.0.0.1 netmask 0xff000000
    inet6 ::1 prefixlen 128

en0: flags=8863<UP,BROADCAST,SMART,RUNNING,SIMPLEX,MULTICAST> mtu 1500
    options=2b<RXCSUM,TXCSUM,VLAN_HWTAGGING,TSO4>
    ether 40:6c:8f:3a:54:cd
    inet6 fe80::426c:8fff:fe3a:54cd%en0 prefixlen 64 scopeid 0x4
    inet 192.168.162.105 netmask 0xffffff00 broadcast 192.168.162.255
    media: autoselect (100baseTX <full-duplex>)
    status: active

en1: flags=8963<UP,BROADCAST,SMART,RUNNING,PROMISC,SIMPLEX,MULTICAST> mtu 1500
    ether 7c:c3:a1:b1:78:7a
    inet 169.254.204.181 netmask 0xffff0000 broadcast 169.254.255.255
    media: autoselect
    status: active

...

bridge0: flags=8863<UP,BROADCAST,SMART,RUNNING,SIMPLEX,MULTICAST> mtu 1500
    ether ac:de:48:5a:66:2b
    inet 192.168.2.1 netmask 0xffffff00 broadcast 192.168.2.255
    Configuration:
        priority 0 hellotime 0 fwddelay 0 maxage 0
        ipfilter disabled flags 0x2
    member: en1 flags=3<LEARNING,DISCOVER>
             port 5 priority 0 path cost 0
bridge0에서 gateway ip가 192.168.2.1임을 알 수 있다.
다시 말해, 이 시점에 AP에 접속하면 모바일 기기의 IP는 192.168.2.2 부터 할당된다.
여기까지는 일반적인 인터넷 연결 공유다.
/etc/pf.conf 설정
Mac OS X Lion 부터 BSD에 있는 pf가 기본이 되고, ipfw는 deprecated 되었다.
여기서는 pf를 사용해 기존에 bridge0에서 en0으로 바로 가는 연결을 proxy 서버를 바라보게 하는 설정을 설명한다.
먼저 /etc/pf.conf 를 살펴보자.
#
# Default PF configuration file.
#
# This file contains the main ruleset, which gets automatically loaded
# at startup.  PF will not be automatically enabled, however.  Instead,
# each component which utilizes PF is responsible for enabling and disabling
# PF via -E and -X as documented in pfctl(8).  That will ensure that PF
# is disabled only when the last enable reference is released.
#
# Care must be taken to ensure that the main ruleset does not get flushed,
# as the nested anchors rely on the anchor point defined here. In addition,
# to the anchors loaded by this file, some system services would dynamically
# insert anchors into the main ruleset. These anchors will be added only when
# the system service is used and would removed on termination of the service.
#
# See pf.conf(5) for syntax.
#

#
# com.apple anchor point
#
scrub-anchor "com.apple/*"
nat-anchor "com.apple/*"
rdr-anchor "com.apple/*"
dummynet-anchor "com.apple/*"
anchor "com.apple/*"
load anchor "com.apple" from "/etc/pf.anchors/com.apple"
설정과 관련해 com.apple 하위의 설정을 사용하고 있고, 관련해서 /etc/pf.anchors/com.apple 파일에 상세 내용이 있음을 대충 알 수 있겠다.
/etc/pf.anchors/com.apple 파일 내용은 다음과 같다.
#
# com.apple ruleset, referred to by the default /etc/pf.conf file.
# See notes in that file regarding the anchor point in the main ruleset.
#
# Copyright (c) 2011 Apple Inc. All rights reserved.
#

#
# AirDrop anchor point.
#
anchor "200.AirDrop/*"

#
# Application Firewall anchor point.
#
anchor "250.ApplicationFirewall/*"
/etc/pf.anchors/com.apple 파일에 추가로 로컬에서 생성한 Proxy Server로 설정하는 항목을 추가해보자.
새로 추가할 anchor 이름을 여기서는 forward.proxy 라고 하자.
#
# com.apple ruleset, referred to by the default /etc/pf.conf file.
# See notes in that file regarding the anchor point in the main ruleset.
#
# Copyright (c) 2011 Apple Inc. All rights reserved.
#

#
# AirDrop anchor point.
#
anchor "200.AirDrop/*"

#
# Application Firewall anchor point.
#
anchor "250.ApplicationFirewall/*"

#
# forward.proxy Anchor
#
anchor "forward.proxy/*"
load anchor "forward.proxy" from "/etc/pf.anchors/forward.proxy"
이제 /etc/pf.anchors/forward.proxy 파일을 만들고 다음과 같이 내용을 작성한다.
rdr pass on bridge0 inet proto tcp from 192.168.2.0/24 to any port www -> 127.0.0.1 port 8888
192.168.2.0/24 아이피로의 요청은 bridge0을 통해서 들어오게 된다. 요청은 기본적으로 en0 으로 바로 가지만, 이 중에 www 요청은 모두 127.0.0.1:8888 으로 forwarding 하자는 의미다.
(여기서 127.0.0.1:8888 은 HTTP Proxy 서버다.)
항목을 추가했으면 아래 명령을 사용해 변경된 설정파일을 적용시킨다.
$ sudo pfctl -vvv -f /etc/pf.conf -E
실행 결과는 다음과 같다.
$ sudo pfctl -vvv -f /etc/pf.conf -E
No ALTQ support in kernel
ALTQ related functions disabled
Loaded 696 passive OS fingerprints
@0 nat-anchor "/*" all
  [ Owner : nil          Priority : 0     ]
@1 rdr-anchor "/*" all
  [ Owner : nil          Priority : 0     ]
@0 anchor "/*" all
  [ Owner : nil          Priority : 0     ]
@2 dummynet-anchor "/*" all
  [ Owner : nil          Priority : 0     ]

Loading anchor com.apple from /etc/pf.anchors/com.apple
@0 nat-anchor "/*" all
  [ Owner : nil          Priority : 0     ]
@1 rdr-anchor "/*" all
  [ Owner : nil          Priority : 0     ]
@0 anchor "/*" all
  [ Owner : nil          Priority : 0     ]
@1 anchor "/*" all
  [ Owner : nil          Priority : 0     ]
@2 anchor "/*" all
  [ Owner : nil          Priority : 0     ]
@3 anchor "/*" all
  [ Owner : nil          Priority : 0     ]

Loading anchor com.apple/forward.proxy from /etc/pf.anchors/forward.proxy
@0 rdr pass on bridge0 inet proto tcp from 192.168.2.0/24 to any port = 80 -> 127.0.0.1 port 8888
  [ Owner : nil          Priority : 0     ]

pf enabled
Token : 18446743525445205896
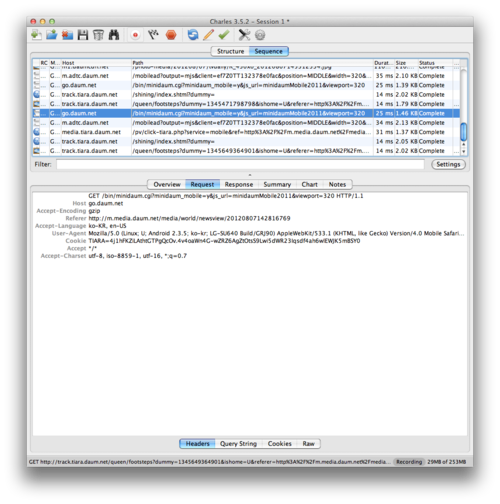
이제 새로 적용되었으니, 클라이언트에서 AP에 접근해보자.
만약 에러페이지가 보일 경우에는 프록시 서버를 transparent 로 설정하기 바란다.
아래는 192.168.2.5 IP를 가진 휴대기기에서 접속한 화면이다.